Introduction
In this tutorial, we will create a lightweight and modular digital signage solution for the Raspberry Pi. The setup includes a digital signage player and, optionally, a local web-based CMS. The system is designed to start automatically on boot and recover seamlessly after unexpected shutdowns or crashes.
The CMS part is optional. If you already use a CMS, stop after Install Autoloader and Crash Recovery and set the player to your existing content URL.
Requirements
- Raspberry Pi 4 or 5 It will work on Raspberry Pi 3, too, but it is not recommended as HD videos will stutter occasionally and overall performance is poor.
- RAM: 512 MB is enough for running garlic-player alone. If you also plan to run garlic-hub (the CMS) on the same device, at least 2 GB is recommended.
- microSD card: at least 16 GB. If you plan to store larger media files locally or run garlic-hub alongside the player, 32 GB or more is recommended. For better reliability and performance, consider booting from a USB SSD or, on the Raspberry Pi 5, an NVMe SSD via a PCIe M.2 HAT, instead of a microSD card.
- Raspberry Pi Imager Personally I like to use it as it makes it straightforward to install the OS and set default settings like ssh access, wi-fi, remote access, etc. You will find it on raspberrypi.com/software/
- Raspberry Pi OS Lite 64 Bit (based on Debian 13 Trixie) The garlic-player is a 64 Bit app. At the same time the lite is easy as we need to install only the required things to make it less vulnerable
- labwc The Lab Wayland Compositor is a lightweight, fast, and rock-solid window manager for Wayland inspired by Openbox.
- garlic-player as an Arm 64 Bit AppImage
- garlic-hub (optional) A Digital Signage CMS which will work with the garlic-player.
- Apache Webserver for the garlic-hub
- PHP8.4 for the garlic-hub
- Side Note The AppImage requires Debian 12 (Bookworm) or newer, or an equivalent distribution. Older systems ship libraries that are too old for the pruned build.
Why labwc is better suited for Kiosk Applications than Cage
Although Cage is designed for single-application kiosks, applications based on QtWebEngine and Xwayland are more reliable under labwc. Labwc provides lightweight Wayland window management while offering greater flexibility for complex desktop applications.
- Better Compatibility with QtWebEngine
Labwc handles auxiliary windows and background processes more gracefully, reducing issues that can occur with Chromium-based applications.
- More Mature Xwayland Support
For libVLC-based ARM64 applications such as garlic-player, labwc provides a more reliable Xwayland environment.
- Improved Popup Handling
Dialogs, dropdowns, and other transient windows can be managed through configuration rules, helping maintain a stable kiosk experience.
While Cage offers a stricter single-window model, labwc can provide the same kiosk behavior by disabling window-management shortcuts and forcing the application into fullscreen mode.
Install Base System
Insert a microSD card with at least 16 GB capacity into the computer. I have some good performance experiences with Sandisk Ultra cards.
In Raspberry Pi Imager click **Choose OS** → **Raspberry Pi OS (other)** → **Raspberry Pi OS Lite (64-bit)**
I encourage you to enable **SSH**, so the remaining installation and configuration steps can be performed remotely instead of directly on the Pi.
Set the remaining preferred options (hostname, username/password, Wi-Fi credentials if needed), then click **Save**, followed by **Write** to flash the image to the SD card.
After putting the card into the Raspberry Pi and let it boot you will see the IP in the top of the screen. Open a ssh connection and start first with a system update.
sudo apt update && sudo apt upgrade -yAfter the system update, install the required packages:
sudo apt install labwc seatd libfuse2 vlc libavcodec-extra libnss3 -yThe app seatd manages access to input devices and the display (the "seat") for programs that don't run under a traditional login manager. Without it, Wayland compositors like labwc cannot access the keyboard, mouse, or GPU when started outside of a normal desktop session, which is the case in this minimal, kiosk-style setup.
The package libavcodec-extra is required for HEVC playback on the Pi 4. Without it VLC reports Codec not supported for some H.265 content. It replaces libavcodec61 with the same version built with additional codecs.
Package libnss3 (Network Security Services) provides the cryptographic and TLS/SSL libraries that QtWebEngine relies on for HTTPS connections. The AppImage does not bundle it, so the native library from Trixie is used instead. This keeps the AppImage smaller and avoids version conflicts with the system libraries.
The AppImage uses the system VLC instead of a bundled copy, since only that gives access to the Pi hardware decoder.
enable seat and add your user into the video group
sudo systemctl enable --now seatd
sudo usermod -aG video,input YOUR_USER
A minimal install does not include a sound server. Without one, ALSA alone cannot play regular PCM audio
through the vc4-hdmi driver: it only exposes the raw IEC958_SUBFRAME_LE format. Installing and
enabling PipeWire, as shown below, adds the missing layer that converts standard audio into a format the
HDMI driver accepts.
sudo apt install pipewire pipewire-pulse wireplumber pipewire-alsa -yand activate it: It is important to do this as non-root
systemctl --user enable --now pipewire pipewire-pulse wireplumberHardware Decoding Limitations
Both the Raspberry Pi 4 and 5 only provide hardware-accelerated decoding for H.265 (HEVC) at 4K. H.264 hardware decoding is limited to 1080p on the Pi 4 and is not hardware-accelerated at all on the Pi 5. Playing 4K H.264 content will fall back to software decoding, which the CPU cannot handle smoothly at that resolution.
If you plan to show 4K content, encode it as H.265/HEVC. For H.264 content, keep the resolution at 1080p or below.
There are several changes made in this section but they will only take effect after a reboot. Reboot the Raspberry Pi now before continuing.
sudo rebootInstall the Garlic-Player
First you download the aarch64 AppImage then make it executable. You should do this with your normal user.
wget https://garlic-signage.com/downloads/garlic-player-aarch64.AppImage
chmod +x garlic-player-aarch64.AppImage
Now you can start the first test. Open a second ssh terminal log in and start labwc with
labwc &You should see now a black screen on the Raspberry with a mouse cursor.
Start the garlic-player and configure the content URL with the CMS of your choice.
DISPLAY=:0 ./garlic-player-aarch64.AppImage -m fullscreenWhen Garlic-player starts successfully for the first time via xcb in xwayland mode it will show a dialog for the content-url and the player name.
If you get could not connect to display :0, labwc is not running or XWayland picked a different display number. Check with ls /tmp/.X11-unix/ and adjust DISPLAY accordingly.
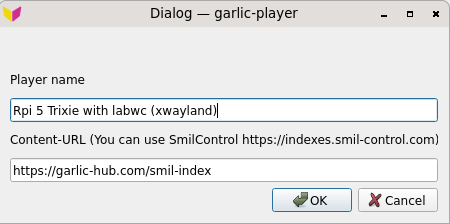
To change the content URL later, press Ctrl+S while garlic-player is running to reopen the setup screen. See the garlic-player command line options & hotkeys for further configurations.
Why XCB and XWayland?
libVLC currently has no public API to embed video output into a native Wayland surface. Because of this, garlic-player relies on XWayland, the X11 compatibility layer built into labwc, rather than native Wayland rendering.
Install Autoloader and Crash Recovery
We have now installed a minimalist Window manager and a digital signage media player, but we want the player to start automatically on boot and recover from crashes.
To start labwc in a kiosk mode you need a service. Replace YOUR_USER with the username that should run the player, and YOUR_USER_GROUP with that user's primary group. On Raspberry Pi OS both are usually identical.
sudo nano -w /etc/systemd/system/labwc-kiosk.service[Unit]
Description=Labwc Kiosk
After=systemd-user-sessions.service seatd.service
[Service]
User=YOUR_USER
Group=YOUR_USER_GROUP
PAMName=login
ExecStart=/usr/bin/labwc
Restart=always
RestartSec=2
TTYPath=/dev/tty1
StandardInput=tty
StandardOutput=journal
[Install]
WantedBy=graphical.target
PAMName=login makes systemd open a full PAM login session for the service. This registers the process with logind, which in turn creates the runtime directory /run/user/UID and sets XDG_RUNTIME_DIR automatically. Without it, labwc would have no place for its Wayland socket and the user services for PipeWire and garlic-player would not start.
Set the service to start after the graphical target.
sudo systemctl enable labwc-kiosk.service
sudo systemctl set-default graphical.target
After start of labwc the player must be started. Create a player service for this.
Open
nano -w ~/.config/systemd/user/garlic-player.serviceand enter
[Unit]
Description=Garlic Player
After=graphical-session.target

[Service]
Environment=DISPLAY=:0
ExecStart=/home/YOUR_USER/garlic-player-aarch64.AppImage -m fullscreen
Restart=always
RestartSec=3

[Install]
WantedBy=graphical-session.target
Reload the user daemon.
systemctl --user daemon-reloadThe player service must start after the graphical-session.target (labwc). To do this put the service in labwc autostart.
Open
nano -w ~/.config/labwc/autostartand edit:
#!/bin/sh
systemctl --user start garlic-player.service
Finally the player service must be set as executable
chmod +x ~/.config/labwc/autostartAt this point, garlic-player will start automatically and keep restarting, but it has no content URL configured yet, so it will just show its setup screen. This gets resolved once garlic-hub is installed and a content URL is configured in the following sections.
Install Garlic-Hub CMS
This section is optional. Install garlic-hub on the same device when you want a standalone signage appliance: one Raspberry Pi that plays the content and hosts the CMS that manages it, comparable to what Anthias (formerly Screenly OSE) does. This is a good fit for a single screen in a shop, a meeting room, or a demo setup where you do not want to depend on a cloud service or a second machine. If you run several players, put the CMS on a separate machine or use a hosted service and skip this section.
Keep the hardware in mind before you decide. Player and CMS share one CPU, one GPU and one memory bus. With 1080p content, a Pi 4 with 2 GB handles both without too much trouble. With 4K content, even a Pi 5 will stutter while you click through the CMS in the browser. Video decoding and the web interface compete for the same memory bandwidth. See Hardware Decoding Limitations. Do the CMS work when nobody is watching the screen.
To save performance this tutorial installs garlic-hub natively instead of using the Docker install. Docker is efficient, but the daemon and the container images take RAM, and add another layer you have to debug through when something does not come up after a power cut. A bare metal install keeps everything under the same systemd that already restarts the player.
If you want to install the CMS alongside the player, follow these steps:
sudo apt install -y apache2 php libapache2-mod-php php-cli php-common php-zip php-curl php-xml php-mbstring php-intl php-sqlite3 php-gd php-imagick ffmpeg imagemagick sqlite3 zip unzip ghostscript composerYou will need a directory to place garlic-hub. /var/www/garlic-hub is the right place. Check for the newest stable of garlic-hub. At the time of writing it is the v1.1.2. You can check on garlic-hub releases if newer versions are available.
wget https://github.com/garlic-signage/garlic-hub/archive/refs/tags/v1.1.2.tar.gz -O /tmp/garlic-hub.tar.gz
sudo mkdir -p /var/www/garlic-hub
sudo tar -xzf /tmp/garlic-hub.tar.gz -C /var/www/garlic-hub --strip-components=1
To make handling easier add your user to the www-data group and vice versa. Group changes only take effect in a new login session, so log out and back in via ssh after running these commands.
sudo usermod -aG www-data YOUR_USER
sudo usermod -aG YOUR_USER www-data
sudo chown -R YOUR_USER:www-data /var/www/garlic-hub
sudo chmod -R g+rwX /var/www/garlic-hub
Now create the var directories
mkdir -p \
  /var/www/garlic-hub/var \
  /var/www/garlic-hub/var/cache \
  /var/www/garlic-hub/var/logs \
  /var/www/garlic-hub/var/weblogs \
  /var/www/garlic-hub/var/keys \
  /var/www/garlic-hub/var/sessions \
  /var/www/garlic-hub/public/var/mediapool \
  /var/www/garlic-hub/public/var/mediapool/thumbs \
  /var/www/garlic-hub/public/var/mediapool/originals \
  /var/www/garlic-hub/public/var/templates \
  /var/www/garlic-hub/public/var/templates/thumbs \
  /var/www/garlic-hub/public/var/templates/originals \
  /var/www/garlic-hub/public/var/playlists \
  /var/www/garlic-hub/public/var/playlists/items \
  /var/www/garlic-hub/public/var/playlists/items/thumbs \
  /var/www/garlic-hub/public/var/playlists/items/originals

cd /var/www/garlic-hub
Install composer libs
composer install --no-dev --optimize-autoloaderGarlic-hub uses these keys internally for signing and encrypting authentication tokens and other sensitive data handled by its crypto class.
openssl genpkey -algorithm RSA -out var/keys/private.key -pkeyopt rsa_keygen_bits:2048
openssl rsa -pubout -in var/keys/private.key -out var/keys/public.key
php vendor/bin/generate-defuse-key > var/keys/encryption.key
copy the .env file from default and add an app secret
cp dockerapp-configs/env.edge .env
echo "APP_SECRET=$(openssl rand -hex 16)" >> /var/www/garlic-hub/.env
now you need to edit the .env file and replace the line:
DB_MASTER_PATH=/var/www/var/garlic-hub.sqlitewith
DB_MASTER_PATH=/var/www/garlic-hub/var/garlic-hub.sqlitecreate a sqlite database
php bin/console.php db:migrateand set the var directories readable for www-data. Thw migrate command outputs Migration succeed. on success. If it fails instead, check that the directory permissions were set correctly in the previous steps.
sudo chown -R www-data:www-data /var/www/garlic-hub/public/var /var/www/garlic-hub/var
sudo chmod -R 775 /var/www/garlic-hub/public/var /var/www/garlic-hub/var
It is also necessary to teach apache to set the correct permissions for files created with www-data.
Apache runs with umask 022, so files in var written by www-data end up without group write permission. Later, you cannot touch them over ssh even if you are in the www-data group. The chmod below fixes the existing files, the umask keeps new files group writable. It has to be a systemd drop-in because Apache has no directive for it.
sudo mkdir -p /etc/systemd/system/apache2.service.d
sudo nano -w /etc/systemd/system/apache2.service.d/override.conf
[Service]
UMask=0002
save the changes and
sudo systemctl daemon-reload
sudo systemctl restart apache2
Configure Apache2
This tutorial uses Apache for its simplicity. If you prefer Caddy instead, a ready-to-use Caddyfile is included in the root directory of garlic-hub.
Activate rewrite module
sudo a2enmod rewritecreate a http.conf to Apache config
sudo nano -w /etc/apache2/sites-available/garlic-hub.confand edit it to this
ServerName _

<VirtualHost *:80>
    ServerAdmin admin@example.com
    DocumentRoot "/var/www/garlic-hub/public"
    <Directory "/var/www/garlic-hub/public/">
        Options FollowSymLinks
        AllowOverride All
        Require all granted
    </Directory>

    ErrorLog /var/log/apache2/garlic-hub.error.log
    CustomLog /var/log/apache2/garlic-hub.access.log combined
</VirtualHost>
Enable the garlic-hub site, deactivate the default site and reload apache
sudo a2ensite garlic-hub.conf
sudo a2dissite 000-default.conf
sudo systemctl reload apache2
Adjust PHP Limits
The Debian defaults allow 2 MB per upload, which is not enough for digital signage video content. Garlic-hub ships a config with sane values. Copy it into the Apache conf.d, where it overrides the php.ini and survives a PHP update.
sudo cp /var/www/garlic-hub/dockerapp-configs/php.ini-custom /etc/php/8.4/apache2/conf.d/99-garlic-hub.iniYou just need to lower the memory_limit to 512M in that file. The shipped value of 1500M targets a dedicated container, not a Pi that also runs the player.
sudo nano -w /etc/php/8.4/apache2/conf.d/99-garlic-hub.ini
sudo systemctl restart apache2
Set Content-URL to localhost
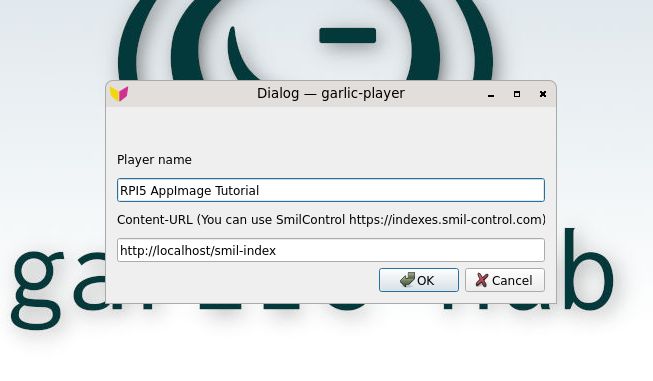
Press Ctrl+S on a keyboard attached to the Pi to open the
content URL dialog and enter http://localhost/smil-index.
Basic Security Considerations
garlic-hub is now reachable on port 80 to anyone on the local network. Before going into production, consider the following:
- Restrict access to garlic-hub to your local network using a firewall, e.g. with
ufw, allowing only trusted devices or subnets. - If garlic-hub needs to be reachable from outside the local network, place it behind a reverse proxy with HTTPS rather than exposing port 80 directly.
- Consider enabling automatic security updates with
unattended-upgrades, since the device may run unattended in the field for extended periods.
Call Garlic-hub
You can call garlic-hub with your favorite browser and enter the ip address of your raspberry pi. There is documentation about garlic-hub essentials and the first-start.
At this point, the setup is complete: garlic-player starts automatically on boot, recovers from crashes, and displays content managed through garlic-hub. From here, log in to garlic-hub to create your first playlist and assign it to the player.
By default, the player polls the CMS every 5 minutes. Changes to a playlist will take up that long to appear. Since player and CMS run on the same device, you can push content from the CMS to the player and it will displayed immediately.